概述
数码管是一种专门用来显示数字的器件,但如果用其直接连接Arduino显示数字,只能一个(位)一个(位)数字得连接显示,且会非常得耗费引脚。因此我们将使用到一个数码管驱动模块,它可以同时驱动显示8位数码管,大大节省了单片机的IO端口。
支持arduino及wifiduino等板卡
引脚定义

引脚 | 功能描述 |
| CLK | 时钟序列输入端。最大速率为10MHz.在时钟的上升沿,数据移入内部移位寄存器。下降沿时,数据从DOUT端输出 |
| CS | 片选端/载入数据(load)。该端为低电平时串行数据被载入移位寄存器。连续的后16位在该端(load)的上升沿时被锁定 |
| DIN | 串行数据输入端口。在时钟上升沿时数据被载入内部的16位寄存器 |
| GND | 电源负极 |
| VCC | 电源正极 |
参数
工作电压:3.3V-5V
驱动芯片:MAX7219CWG
外形尺寸(长×宽×高):72mm×17mm×9mm(不含插针)
显示内容:8位带小数点
固定孔径:3mm
示例程序(arduino)
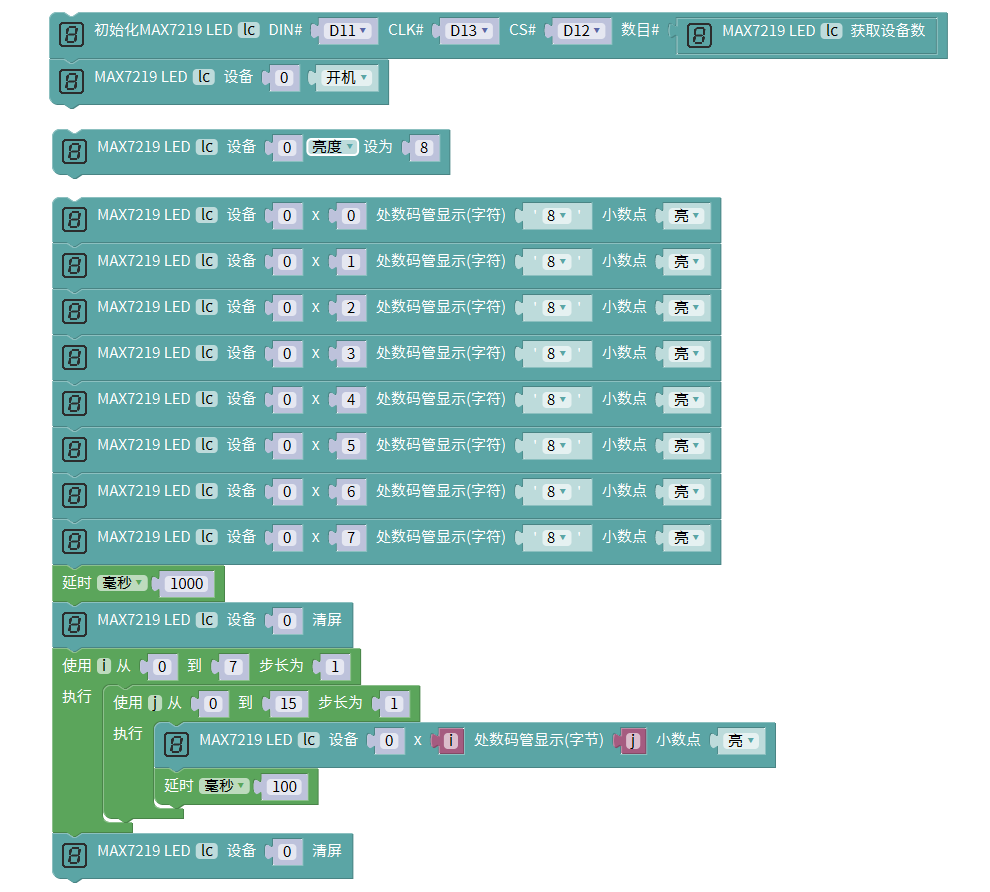
#include "LedControl.h"

LedControl lc=LedControl(11, 13, 12, lc.getDeviceCount());
//LedControl lc=LedControl(D11, D13, D12, lc.getDeviceCount());  wifiduino
void setup(){

}

void loop(){
  lc.shutdown(0, false);

  lc.setIntensity(0, 8);

  lc.setChar(0, 0, '8', true);
  lc.setChar(0, 1, '8', true);
  lc.setChar(0, 2, '8', true);
  lc.setChar(0, 3, '8', true);
  lc.setChar(0, 4, '8', true);
  lc.setChar(0, 5, '8', true);
  lc.setChar(0, 6, '8', true);
  lc.setChar(0, 7, '8', true);
  delay(1000);
  lc.clearDisplay(0);
  for (int i = 0; i <= 7; i = i + (1)) {
    for (int j = 0; j <= 15; j = j + (1)) {
      lc.setDigit(0, i, j, true);
      delay(100);
    }
  }
  lc.clearDisplay(0);

}
mixly示例程序
wifiduino示例程序

其他资料
arduino 库文件: http://download.openjumper.cn/LedControl.rar
Arduino下载与安装: https://www.arduino.cn/thread-5838-1-1.html
Mixly下载与安装: https://openjumper.cn/mixly-oj/