简介:
该串口摄像头是一款基于串口TTL通信接口的摄像头模块,可以方便的与Arduino主控器进行连接,通过串口即可读取图像数据,从而可以进行一些图像处理方面的工作。
参数:
BPS 38400
电平:TTL电平
制式:NTSC ,510×492
图片格式:JPEG格式
图片大小:QVGA(320*240)高、中、低三档可选
串口波特率:9600~115200
PCB板尺寸:38×38mm/32×32mm 灵活工厂外壳组装
工作电压:DC4.8V~DC6.5V
工作电流:90mA(红外灯不工作时)
镜头:FOV 60°~120°,650普通镜头/850、940 IR红外镜头
用户可参照通信协议任意更改,图片越小,图片传送速度越快
接线端子:6PIN-2.0mm/2PIN-2.0mm(红外灯板接口)
工作温度:-20℃~ +60℃,存储温度:-30℃至70℃,湿度:90%非凝结。
应用说明:
一:串口工具调试摄像头(USB转串口模块)
步骤一:将摄像头模块与USB转串口模块(OpenJumper cp2102 module)连接
接线:
| 摄像头模块 | USB转串口模块 |
| VCC | VCC |
| GND | GND |
| RX | TX |
| TX | RX |
步骤二:USB转串口模块连接至电脑后安装驱动
驱动下载地址: http://openjumper.cn/usb-serial/
摄像头软件下载:PTC01
步骤三:打开摄像头串口工具(必须以管理员权限打开)
1、选择对应串口端口,波特率默认38400 ,单击打开
2、选择对应尺寸及其他参数
3、单击复位,复位成功会收到如下信息
4、单击单击拍照,等待数据传输
拍照成功会显示拍得的图像及提示信息
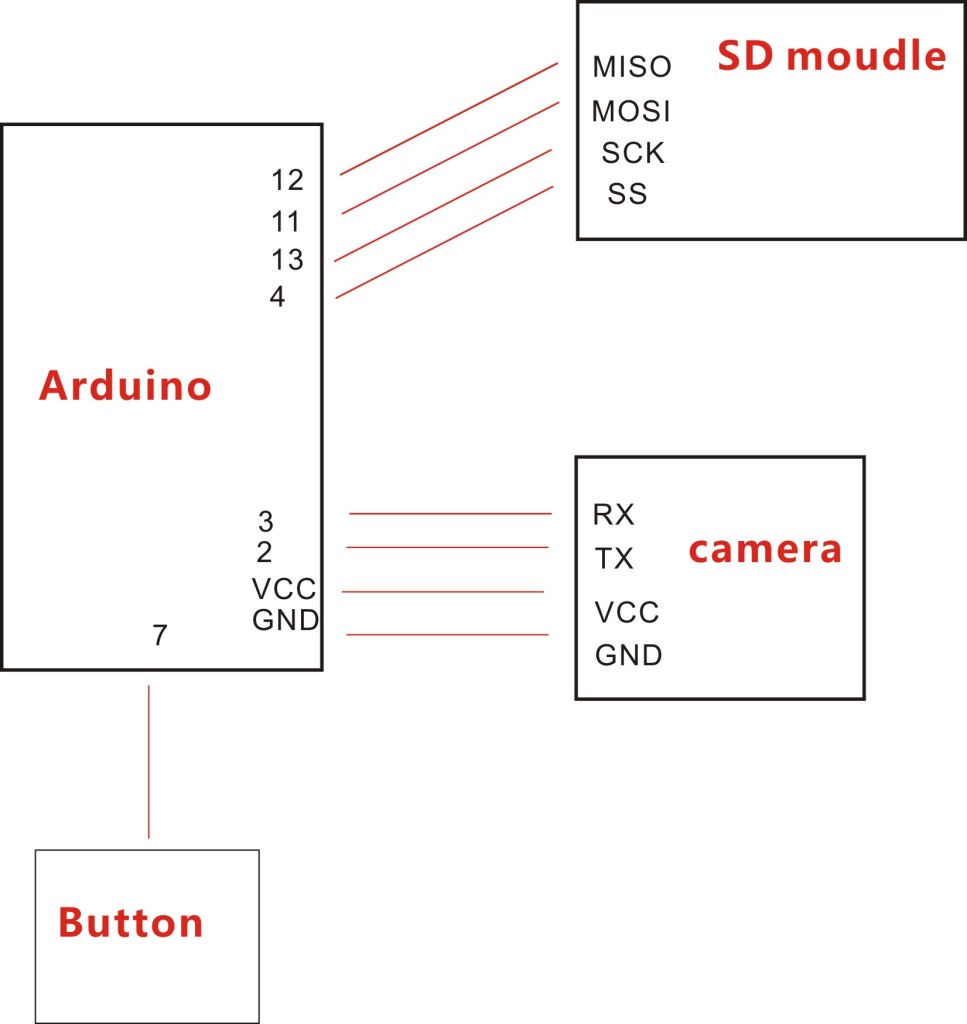
二、Arduino 驱动示例 (利用按键SD卡模块和摄像头模块实现拍照功能)
连线示意图:
#include <camera_VC0706.h>
#include <SD.h>
#include <SoftwareSerial.h>

#define chipSelect 4
#if ARDUINO >= 100
SoftwareSerial cameraconnection = SoftwareSerial(2, 3);
#else
NewSoftSerial cameraconnection = NewSoftSerial(2, 3);
#endif
camera_VC0706 cam = camera_VC0706(&cameraconnection);
void setup() {


#if !defined(SOFTWARE_SPI)
#if defined(__AVR_ATmega1280__) || defined(__AVR_ATmega2560__)
	if(chipSelect != 53) pinMode(53, OUTPUT); // SS on Mega
#else
	if(chipSelect != 4) pinMode(4, OUTPUT); // SS on Uno, etc.
#endif
#endif

	pinMode(7,INPUT_PULLUP);
	Serial.begin(9600);
	Serial.println("VC0706 Camera test");

	//SD卡检测
	if (!SD.begin(chipSelect)) {
		Serial.println("Card failed, or not present");
		return;
	}

	// 查询摄像头
	if (cam.begin()) {
		Serial.println("Camera Found:");
	} else {
		Serial.println("No camera found?");
		return;
	}
	// 摄像头版本号
	char *reply = cam.getVersion();
	if (reply == 0) {
		Serial.print("Failed to get version");
	} else {
		Serial.println("-----------------");
		Serial.print(reply);
		Serial.println("-----------------");
	}

	// 选择合适的图片尺寸 640x480, 320x240 or 160x120
	// 图片越大,传输速度越慢
	cam.setImageSize(VC0706_640x480);
	//cam.setImageSize(VC0706_320x240);
	//cam.setImageSize(VC0706_160x120);

	uint8_t imgsize = cam.getImageSize();
	Serial.print("Image size: ");
	if (imgsize == VC0706_640x480) Serial.println("640x480");
	if (imgsize == VC0706_320x240) Serial.println("320x240");
	if (imgsize == VC0706_160x120) Serial.println("160x120");

	Serial.println("Get ready !");

}

void loop() {

	if(digitalRead(7)== 0) { //按键检测
		delay(10);
		if(digitalRead(7)== 0) {
			if (! cam.takePicture())
				Serial.println("Failed to snap!");
			else
				Serial.println("Picture taken!");
			char filename[13];
			strcpy(filename, "IMAGE00.JPG");
			for (int i = 0; i < 100; i++) {
				filename[5] = '0' + i/10;
				filename[6] = '0' + i%10;
				// create if does not exist, do not open existing, write, sync after write
				if (! SD.exists(filename)) {
					break;
				}
			}
			File imgFile = SD.open(filename, FILE_WRITE);
			uint16_t jpglen = cam.frameLength();
			Serial.print(jpglen, DEC);
			Serial.println(" byte image");

			Serial.print("Writing image to ");
			Serial.print(filename);

			while (jpglen > 0) {
				// 一次读取32bytes
				uint8_t *buffer;
				uint8_t bytesToRead =  min(32, jpglen); // 调节一次性读取数据大小,从32-64byte ,过大容易不工作
				buffer = cam.readPicture(bytesToRead);
				imgFile.write(buffer, bytesToRead);
				jpglen -= bytesToRead;
			}
			imgFile.close();
			Serial.println("...Done!");
	        cam.resumeVideo();
		}
	}
}
下载程序成功后,打开串口助手:
按下按键拍照,等待图片上传至SD卡,这个过程可能需要十几秒,耐心等待,成功后会提示 Done !
文件库下载:camera_VC0706


串口工具调试摄像头(USB转串口模块)能拍照,但是第二个Arduino 驱动示例 (利用按键SD卡模块和摄像头模块实现拍照功能)返回 “No camera found?” 怎么办啊?
无法直接把库安装到library文件,采用1.8.10 arduino uno 没有newsoftSerial 没有hardwareSerial